The Alpkit Rig 3.5 Tarp
 I have been using the Alpkit Rig 7 for a while now and found it to be a very good tarp. Loads of tie out points coupled with generous size has got me through some wet, windy and cold nights in relative comfort. It is big though even when packed and although in bad weather it does mean you have plenty of space to get things undercover and cook easily I feel it’s probably a bit big for the summer or for racing.
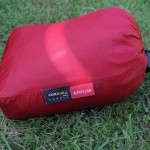
Up steps the Rig 3.5 which is the latest edition to the Alpkit tarp range. As the name suggests this is a half size version of the Rig 7 with all the same features… essentially loads of tie out points. Over to the right there is the comparison of the packed sizes of the Rig7 and Rig3.5 and you can see just how much smaller it is.
Some facts:
- 2.4m x 1.4m
- 33d sil PU Cordura
- 16 Re-inforced attachment points – 4 lifters, 12 edge tie downs
- Weight inc stuff sac: 270 g
As I have had a dodgy knee for a few weeks now and haven’t been able to ride so I got my out doors fix by having a go at trying some different pitches in the garden to see how it might go up. Stu on the Bearbones blog wrote a number of articles about pitching the Rig7 a while ago (part 1, part2) which I have to acknowledged has inspired some of the pitches. I didn’t necessarily tweak every pitch to the degree that you might in the wild. A few of the guys could have been pulled at slightly different angles to get a more taught pitch but it would have taken a while to do this for each set up and time was a factor.
There are a few things I have added to complete the set up.
- Poles – I’m using the 2 Pole-A-Bear poles that I use with my Rig7. They are normally 3 section, 110cm poles but to use them with the smaller tarp I’m only using 2 sections making them 70cm long.
- Guy lines – I have attached a guy line to each corner and they will live permanently on the tarp. Every set up I will use will almost certainly need all four corners tied down some how so I don’t think it’s worth ever planning to take these off.
Additionally I will always have at least 2 other guy lines with me that will normally be the ones that will use on the poles depending on the exact pitch that I end up going for on any given set up.
It’s probably also worth carrying at least one other line that can be used to pull out a tie point if you have something like an over hanging branch or other improbably placed natural assistance.
UPDATE: I used a Bowline to tie the guys on. - Tie outs – I have made 4 tie outs, each a loop of cord 50cm long that I have attached the centre points of each side of the tarp. I don’t see myself always using all 4 but it will be handy to be able to tie down the edges and be able to have these edges off the ground. You can see some examples of this below. At the time of taking the photos I hadn’t attached them all yet and in places I was using guy lines instead.
UPDATE: I used a Sheet bend to tie the loop of the tie outs.
 |
 |
This one could be done with 1 pole but I added the second attached to one of the lifters to give a little bit more height at the back. The centre of the short sides have a guy line in the picture that I have replaced with the cord tie outs that I mentioned above. You can see the tie out in the second picture at the back.
 |
 |
This is a variation of the first pitch but with the second pole used to give more height at the “head” end rather than the width. The guy is attached to one of the lifters so that the edge is still tied down.
 |
 |
This could be thought of as a 3rd variation with the pole at the edge attached the same as the first pole. This gives a lot more room and feels less claustrophobic. In better weather there is also a much better view out and is easier to cook under.
 |
 |
Stu calls this the “almost tent” which is the set up I have used most with the Rig7. It’s essentially a variation on an A-Frame, with one end lowered. The end pole is tied off to a lifter rather than the edge. This gives a much more solid cover in bad weather and will keep you dry in even the worst of conditions. The front opening could either be lowered more or be set close to a tree or wall to provide even more cover.



It’s the smallest one-person tarp on the market, and I am afraid it could be too small. Most of the others are about 10cm wider and 30-40 cm longer. Do you think the 3.5 size is just right or would you recommend something bigger? If you had the chance to use your 3.5 in bad weather so far.
Thanks 🙂
I have used in bad weather a few times now.
The first time I had the pitch wrong (to high A-frame) and rain was coming in underneath at the head end. I just pulled the bivi bag over my head and it didn’t disturb me the rest of the night.
The few other times I have used it during rain I have pitched it a bit lower and/or with the head end protected by a tree/wall/rocks etc. It has been fine since then.
If I was expecting bad weather and knew I wanted to cook under the tarp then I might use the Rig7 instead.